In this article, we will
learn about how to configure the password protected Apache Web Server to
restrict from online visitors without validation so that we can hide
some essential and critical information to the un-authenticated users and how
to penetrate it’s the weak configuration to breach its security and exploit it.
Table of Content
Introduction to HTTP Basic Authentication
§ Lab Set_up Requirement
Set Up Password Authentication
§ Installing the Apache Utilities Package
§ Creating the Password File
§ Configuring Access Control inside the Virtual Host
Definition
§ Configuring Access Control with .htaccess Files
§ Confirm the Password Authentication
Exploiting HTTP Authentication
§ xHydra
§ Hydra
§ Ncrack
§ Mdeusa
§ Metasploit
§ Burpsuite
Introduction to HTTP Basic
Authentication
In the context of
a HTTP transaction, basic access authentication is a method
for a HTTP user agent to provide a user
name and password when making a request.
HTTP Basic authentication
(BA) implementation is the simplest technique for enforcing access
controls to web resources because it doesn’t require cookies, session
identifiers, or login pages; rather, HTTP Basic authentication uses standard
fields in the HTTP header, obviating the need for handshakes.
The BA mechanism provides no confidentiality protection
for the transmitted credentials. They are merely encoded with Base64 in
transit, but not encrypted or hashed in any
way. HTTPS is, therefore, typically preferred used in conjunction
with Basic Authentication.
For more details read from wikipedia.org
Lab Set_up Requirement
Apache Server (Ubuntu
14.04)
Penetration Testing Machine (Kali
Linux)
Set Up Password Authentication
Installing the Apache Utilities Package
Let’s start with following
command to install an Apache2 utility package called ‘htpasswd’. The htpasswd
is used to create and update the flat-files used to store usernames and
password for basic authentication of HTTP users.
sudo apt-get install
apache2 apache2-utils
Creating the Password File
Now use
htpasswd command to create a password file that Apache will use to
authenticate users and use a hidden file “.htpasswd” in our /etc/apache2
configuration directory to store password.
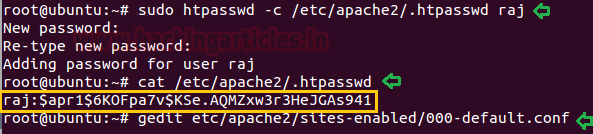
sudo htpasswd -c
/etc/apache2/.htpasswd raj
cat
/etc/apache2/.htpasswd
gedit
etc/apache2/sites-enabled/000-default.conf
Configuring Access Control inside the Virtual Host Definition
Now saved the following configuration in 000-default.conf
file.
AuthType Basic
AuthName "Restricted Content"
AuthUserFile /etc/apache2/.htpasswd
Require valid-user

Configuring Access Control with
.htaccess Files
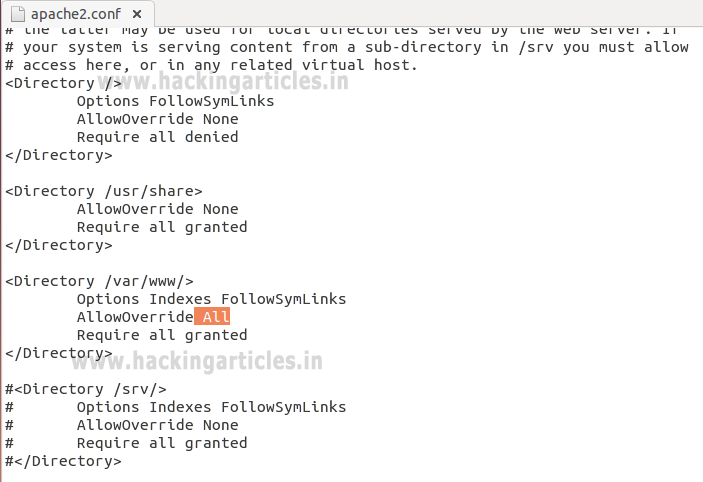
Open the main Apache configuration file to enable password
protection using .htaccess files and add following line as highlighted.
sudo gedit
/etc/apache2/apache2.conf
ServerName
localhost
Enable .htaccess processing by changing the AllowOverride
directive "None" to "All" in the block
for the /var/www directory and then save the file and restart the apache service.
Options Indexes FollowSymLinks
AllowOverride All
Require all granted
Next, you need to add an .htaccess file to the directory you
wish to restrict. Here, I want restrict the entire website which is could be
through /var/www/html, but you can place this file in any directory where you wish to restrict access:
sudo nano
/var/www/html/.htaccess
AuthType Basic
AuthName
"Restricted Content"
AuthUserFile
/etc/apache2/.htpasswd
Require valid-user
sudo service
apache2 restart
While configuring .htaccess file we had added few options
for the block directory. Let’s see what these configuration denotes.
AuthType Basic: This will set up a basic
authentication for our site.
AuthName “Restricted Contents”: This will show
the name of the authentication at the prompt.
AuthUserFile /etc/apache2/.htpasswd : This will
show the location of the authentication file.
Require Valid-user: This will be used by one user
who has confirmed their authentication who are permitted to access the website.
Confirm the Password Authentication
Try to access your restricted content in a web browser to
confirm that your content is protected. I will be accessible with a username
and password prompt that looks like this:
If you will try to access the website without
authentication or canceled the Required Authentication page then it will
displace 401 error Unauthorized Access.
If you are valid users and try to access password protected
website by using valid credential, for example we had create an account with
raj: 123 to access apache http service.
As you can observe that, now we are able to access the
content of website.
Exploiting HTTP Authentication
xHydra
This is the graphical version to apply dictionary attack
via FTP port to hack a system. For this method to work:
Open xHydra in your kali. And select Single
Target option and their give the IP of your victim PC. And select HTTP in
box against Protocol option and give the port number 80 against
the port option.
Now, go to Passwords tab and select Username List and
give the path of your text file, which contains usernames, in the box adjacent
to it.
Then select Password List and give the path of your text
file, which contains all the passwords, in the box adjacent to it.
After doing this, go to Start tab and click on Start button
on the left.
Now, the process of dictionary attack will start. Thus, you
will attain the username and password of your victim.
Hydra
Hydra is often the tool of choice. It can perform rapid
dictionary attacks against more than 50 protocols, including telnet, ftp, http,
https, smb, several databases, and much more
Now, we need to choose a wordlist. As with any dictionary
attack, the wordlist is key. Kali has numerous wordlists built right in.
Run the following command
hydra -L user.txt -P
pass.txt 192.168.0.105 http-get
-L: denotes path
for username list
-P: denotes path for password list
Once the commands are executed it will start applying the
dictionary attack and so you will have the right username and password in no
time. As you can observe that we had successfully grabbed the HTTP username as raj
and password as 123.
Ncrack
Ncrack is a high-speed network authentication cracking tool.
It was built to help companies secure their networks by proactively testing all
their hosts and networking devices for poor passwords.
Run the following command
ncrack -U user.txt -P
pass.txt http://192.168.0.105
Here
-U: denotes
path for username list
-P: denotes path for password list
As you can observe that we had successfully grabbed the
HTTP username as raj and password as 123.
Medusa
Medusa is intended to be a speedy, massively parallel, modular,
login brute-forcer. It supports many protocols: AFP, CVS, FTP, HTTP, IMAP,
rlogin, SSH, Subversion, and VNC to name a few
Run the following command
medusa -h
192.168.0.105 -U user.txt -P pass.txt -M http -f
Here
-U: denotes
path for username list
-P: denotes path for password list
As you can observe that we had successfully grabbed the
HTTP username as raj and password as 123.
Metasploit
This module attempts to authenticate to an HTTP service. Open
Kali terminal type msfconsole and then type:
use auxiliary/scanner/http/http_login
msf auxiliary(scanner/http/http_login) > set user_file
user.txt
msf auxiliary(scanner/http/http_login) > set pass_file
pass.txt
msf auxiliary(scanner/http/http_login) > set rhosts
192.168.0.105
msf auxiliary(scanner/http/http_login) > set stop_on_success
msf auxiliary(scanner/http/http_login) > exploit
Burp Suite
Now here I had just typed the random value for
authentication in order to fetch the request through burp suite. So before you
sent the request to server turn on the burp suite and select
proxy tab then, click on the intercept is on after then send
the user authentication by clicking ok
Thus the sent request will be captured by burp suite which
you can see in the given below image. In the screenshot I
had highlighted some value in the last line. Here it tells the type
of authentication provided is basic and if you have read above theory of basic
authentication I had described that it is encoded in base 64.
Now time to generate the encoded value for authentication
inside the burp suite. Click on action tab select send to
intruder for HTTP Fuzzing attack.
Now open intruder frame and click on the position.
Configure the position where payload will be inserted into the request.
The attack type determines the way in which the payload assigned to payload
position. Now select “the encoded
value of authentication” for payload position and click to ADD button on the left side of the frame.
The base64 encoded value of Authentication is a combination
of username and password now the scenario is to generate the same encoded value
of authentication with the help of user password dictionary Therefore, I have
made a dictionary which contains both user password names in a text file.
In order to use dictionary as payload click on payload tab under intruder; now load
your dictionary which contains user password names from payload options.
But we want to send a request in the encoded value of our
payload. To encode your payload click on ADD
button available under payload processing.
A new dialog box will
generate to select the rule choose an encode option from the list; now select base 64 from drag down list of URL
encode key character for payload processing.
This will start a brute force attack and try to match string
for user authentication. In the screenshot you can observe the status “200 OK” and
length “11788”of the highlighted value is different from rest of the values.
This means we can use this encoded value to bypass the user authentication,
which occur from request number 5. Now check the username and password on 5th
line in the dictionary. In the dictionary I found raj: 123 have matching
authentication.
Or you can also use this encoded Auth value to bypass the
apache http authentication page via burp suite intercepted data.
Copy the above auth value and paste replace it with
intercepted authorization a shown in below and forward the request to access
restricted content.
Booom!!! Here we have successfully access the content of
website.
Hope you people have enjoy this article and learnt how weak
configuration security can easily breach and unauthorized person can access the
restrict content of your website.