Secure
Shell
(SSH) is defined as a network protocol to operate network services
securely over an unsecured network. The standard TCP port for SSH is 22. The
best application of SSH is to remotely login into computer systems by users.
This article will be explaining about the network securities which help the network administrator to secure the service of SSH on any server through multiple ways.
Methods Used:
1. Port Forwarding
2. Disable Password Based Login And Using PGP Key (Public Key)
3. Disable Root Login and Limit SSH User’s Access
4. Google Authenticator
5. Time Scheduling
6. Disable Empty Passwords
Before moving on, Let us first install SSH server on our client machine using following command.
sudo apt-get install openssh-server

Port Forwarding


Cron is a is a built-in service of linux to schedule task , which enables a job (command or script) on the server to run automatically over specified time and date.
*/2 * * * * root service ssh start
*/4 * * * * root service ssh stop
Save the changes made in the file.

Wait for service to reboot. Using nmap we have scan port 22.
nmap -p 22 192.168.1.104
After running the scan , we will observe that ssh service on port 22 is CLOSED because it is the 4th minute which has started.
Now if our command is working properly it should start itself on every 2nd minute, to confirm it we will again initiate a scan using nmap.
nmap –p 22 192.168.1.104
As we can see that the port is in OPEN state now.

Disable Empty Password
In this security measure , as a best practice ; one should always disable empty password login to the SSH Server. To enable this setting we need to open sshd_config file using gedit command and make the following changes:
PermitEmptyPasswords No
These changes will simply disable empty password login’s into SSH Server.

Author: Ashray Gupta is a Security Researcher and Technical Writer at Hacking Articles. See’s things from a different angle and an out of the box thinker. Contact Here
This article will be explaining about the network securities which help the network administrator to secure the service of SSH on any server through multiple ways.
Methods Used:
1. Port Forwarding
2. Disable Password Based Login And Using PGP Key (Public Key)
3. Disable Root Login and Limit SSH User’s Access
4. Google Authenticator
5. Time Scheduling
6. Disable Empty Passwords
Before moving on, Let us first install SSH server on our client machine using following command.
sudo apt-get install openssh-server
Port Forwarding
Once the SSH services are configured
and running, we can begin with our first security measure which is Port Forwarding. Upon initiating the
scan on client’s machine IP address
using nmap , it shows that SSH is running on Port 22.
Navigate to /etc/ssh and we will find a file named sshd_config in the client’s machine.
cd /etc/ssh
Open the file sshd_config using nano
command.
Now change the port 22 to port 2222 as
shown in the below screenshot and save the
changes made in the sshd_config file . Hence , in this way we have
forwarded the port from 22 to 2222.
Now to confirm port forwarding, we will
again scan the Client’s IP address
using nmap
nmap 192.168.1.104
The output of the nmap shows that TCP port
2222 is opened ; however shows EthernetIP-1 in the service description which doesn’t
give exact description of the service running .So we will run the following
nmap command with version detection option
nmap
-sV 192.168.1.104
With the next output of nmap , it is clearly
visible that SSH services are running on TCP Port 2222 along with the
description of OpenSSH version.
Disable Password Based Login
To begin with this security measure we
need to download and install PuTTY Key
Generator.
Note :
PuTTYgen is an key generator tool for creating SSH keys for PuTTY and stores
keys in its own format ( .ppk extension)
Open it and Click on Generate.
Clicking on Generate will initiate the
process of generating a Public and
Private Key , as shown in the image.
Once Public and Private Key are
generated , click on Save Public Key.
This will save the key as a Public Key.
Now open the Ubuntu terminal of our
server and type ssh-keygen.
The above command will
create a folder named .ssh and then create an empty text file with
the name authorized_keys in the same folder. After that copy the “ssh_login.ppk”
file which was created using PuTTy Key
Generator previously and paste it into the .ssh folder as shown
in the image.
In the terminal, move into .ssh folder
and type the following command:
puttygen -L “ssh_login.ppk”
This
command will generate a key.
Now
copy this key and paste it in the empty file named authorized_keys using
nano
command and save it.
Now
open the putty configuration tab, then go to Session tab and give the
IP Address & Port Number of
your Clients Machine were ssh server is configured.
Now
go to data and give Auto-login username.
Navigate
to SSH>Auth and give the path of ssh_login.ppk file (public key that was
generated earlier) and then click Open.
It will simply use the public key to Login into SSH Server without asking for
Password.
Open the sshd_config file in /etc/ssh
using gedit command .Here we will
make changes in line #PasswordAuthentication
as shown in the image.
Current configuration
#PasswordAuthentication yes
Now we will edit parameter value yes to no and remove the # (hash) as shown in the below image. Once done save the
changes made. These changes will disable any user to log into SSH Server using the
password.
PasswordAuthentication no
As you can see these settings have
disabled password based login and is indeed asking for a Public Key to log in.
Disable Root Login and Limit SSH
User’s Access
To begin with this security measure
you need to make some new User’s using adduser
command (New User’s We have Created:
h1,h2,h3,h4) then make changes in the sshd_config
file in /etc/ssh using gedit
command. Type the Following Lines under #Authentication:
#No root login allowed (h2 can login as sudo
–s)
PermitRootLogin no
## only allow 1 users h2 (sysadmin)
AllowUsers h2
Remember to save the changes made. This
will disable Root Login and will allow only h2 user to log into ssh server
remotely.
As you can see only h2 user is able to
successfully log into SSH Server, where h1 and h3 users permission to log into
SSH Server is denied.
Google Authenticator
To begin with the two-factor
authentication over SSH Server,you need to download the google authenticator
application on your phone and also install the required dependency package for
Ubuntu using following command:
sudo apt-get install
libpam-google-authenticator
NOTE-The installation of google authenticator
will as ask a couple of questions give Yes for every question asked.
After the installation is completed.
Open terminal and type command:
google-authenticator
We will see a barcode. Scan it using the
google authenticator application on your phone.
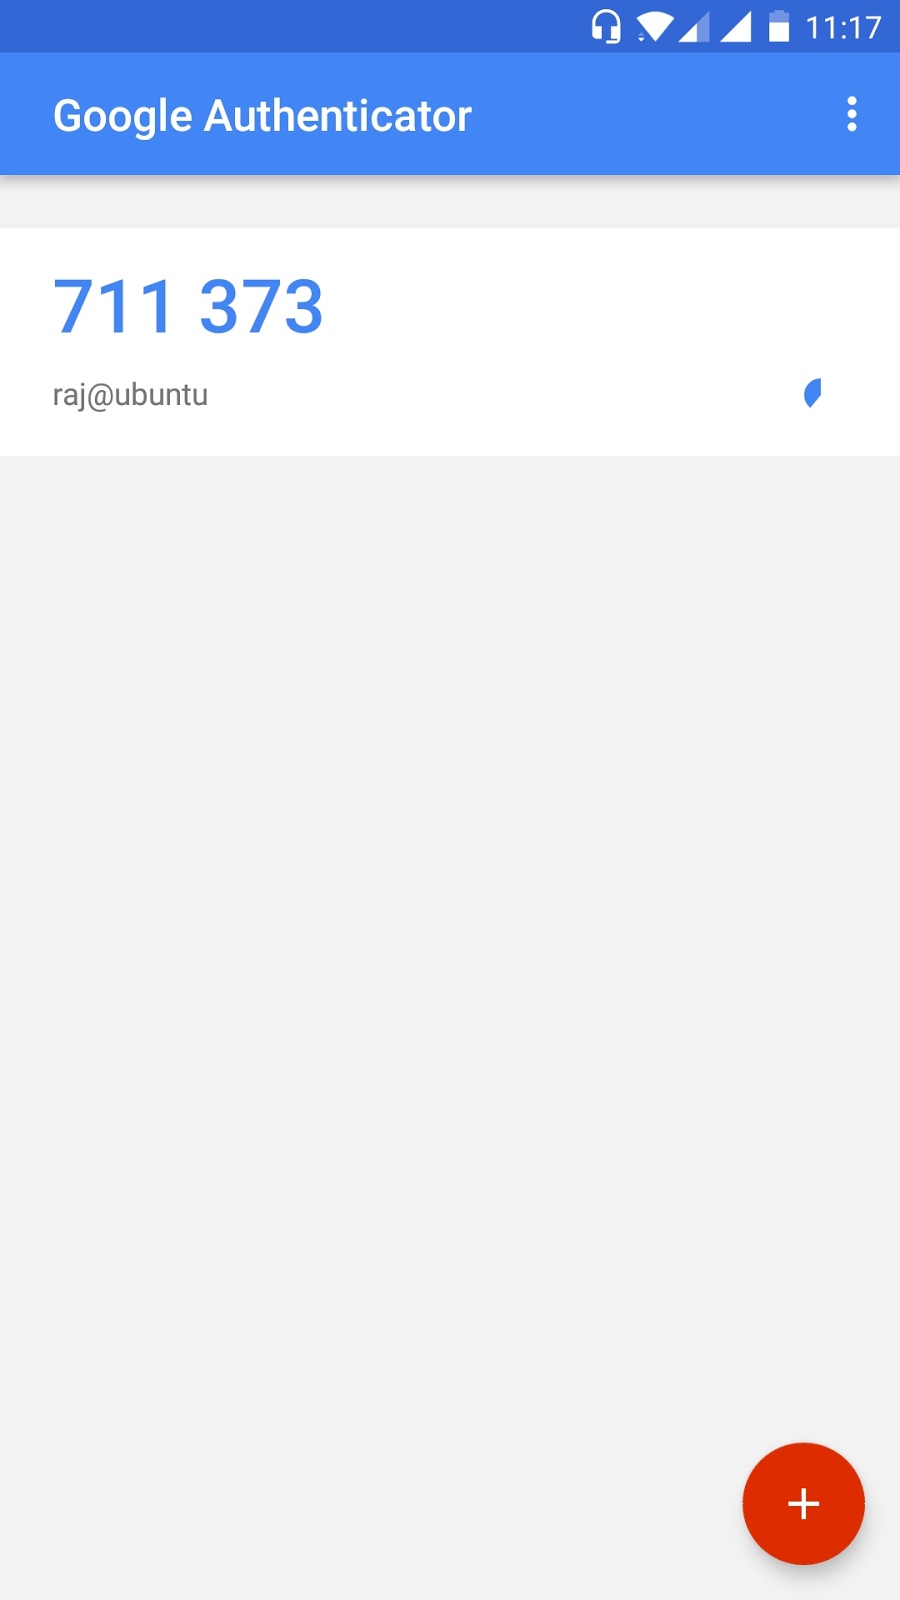
Once the application has scanned the
barcode, it will start generating One Time Password’s as shown in the image.
Now open sshd file in /etc/pam.d
using gedit command and make the
following changes:
1. Add # to @include common-auth
2. Add Line (auth required pam_google_authenticator.so)
under @include common-password
As shown in the image.
Now open sshd_config file in /etc/ssh
using gedit command and make the
following changes.
ChallengeResponseAuthentication yes
When we log into SSH Server it will prompt
for a verification code, Here we have to enter the One Time Password generated
on our google authenticator application. As you can see we have successfully
logged into SSH Server using One Time Password.
Time Scheduling
In
this security measure we are going to set time limit on SSH service on the server.Cron is a is a built-in service of linux to schedule task , which enables a job (command or script) on the server to run automatically over specified time and date.
Here we are going to
schedule SSH services using crontab
We
had open crontab in /etc using nano
command. Now lets schedule ssh service in a way that it will start for every
2nd minute and will get stop after every 4th minute. The command
used to schedule the SSH Service are given below:*/2 * * * * root service ssh start
*/4 * * * * root service ssh stop
Save the changes made in the file.
Wait for service to reboot. Using nmap we have scan port 22.
nmap -p 22 192.168.1.104
After running the scan , we will observe that ssh service on port 22 is CLOSED because it is the 4th minute which has started.
Now if our command is working properly it should start itself on every 2nd minute, to confirm it we will again initiate a scan using nmap.
nmap –p 22 192.168.1.104
As we can see that the port is in OPEN state now.
Disable Empty Password
In this security measure , as a best practice ; one should always disable empty password login to the SSH Server. To enable this setting we need to open sshd_config file using gedit command and make the following changes:
PermitEmptyPasswords No
These changes will simply disable empty password login’s into SSH Server.
Author: Ashray Gupta is a Security Researcher and Technical Writer at Hacking Articles. See’s things from a different angle and an out of the box thinker. Contact Here


